Sourdough Adventures
Baking with Sourdough
Baking with sourdough creates delicious, healthy breads that can delight anyone who tries them. Sourdough baking is a recent adventure for me — one I had thought about for years. After making more than a dozen loaves, experimenting with different flours and two separate sourdough cultures, all using a simple no-knead process, here are some notes.
Capturing Your Sourdough
Where I live, it was surprisingly easy to create my own sourdough starter — or rather, to capture a few wild yeast spores that smelled unmistakably like sourdough.
You'll need:
- a mason jar
- a rubber band
- a piece of cheesecloth or any loose-weave cloth
Instructions:
Add 2 tablespoons of organic flour (white or whole wheat both work) to the jar.
Add about 1 cup of water.
- Water matters. If you have spring water, use it.
- Filtered or rainwater can also work depending on your area.
Stir well. The consistency should be runny.
Cover the jar with cloth and secure with a rubber band.
Set the jar outside or around the garden. Let it catch some fresh air.
- A little sunlight is good.
- At night, bring it inside to keep wildlife out.
Repeat for a few days. Stir and smell it daily until you notice a faint sourdough aroma.
Once you smell that familiar tang — you have a starter.
Keeping Your Starter Happy
- Store the starter in a mason jar with the lid loosely screwed on.
- Keep it at room temperature if you bake every few days.
- If you bake less often, keep it in the fridge.
Preparing the Dough (One Day Before Baking)
- Prepare a large ceramic or glass bowl, lightly coated with olive oil.
- In a separate mixing bowl add 4 cups of flour, for example organic white wheat for a lighter bread or 3 cups white weat and 1 cup dark rye, add 2 or 3 pinches of sea salt
- Add 3/4 cup of sourdough starter into a measuring cup (for example 2 cups capacity), make sure you shake and mix it well first and fill to a total of 2 cups with cold spring water. Make sure to keep at least 1 cup of starter in the jar.
- Feed the starter jar with 2 tablespoons of flour and 1 cup of water.
- Stir well, replace the loose lid, and store it on the cupboard.
- Add liquid started water mix into mixing bowl with flower and light stir with a wooden spoon until a consitent blob as formed. Transfer the blob into the bowl that you covered with olive oil in step 1.
- Cover the bowl with the dough with a towel and secure it with a rubber band for fermentation and store in a cup board.
- Let the dough rest for about 24 hours.
Bake Day!
- The dough should have risen significantly.
- Turn it onto a floured surface and fold it over a few times. Using a rubber spatula helps greatly to slowly get the dough to leave the bowl and drop onto the flowered surface.
- After folding the dough over, return it to the bowl, add a little flour to prevent sticking.
- Cover again with a kitchen towel and let it rise for 2 more hours.
During the final rise:
- After 1.5 hours, place your Dutch oven (with lid on) into the oven.
- Preheat to 475°F (245°C).
Baking:
- Carefully remove the hot Dutch oven (always use oven mitts).
- Remove the lid and gently drop the dough inside.
- Wiggle the pot slightly to even out the shape, don't worry too much about the shape, the bread will naturally take shape during baking.
- Cover with lid and bake for 30 minutes.
- Remove the lid and bake for 15 more minutes to help a nice crust form.
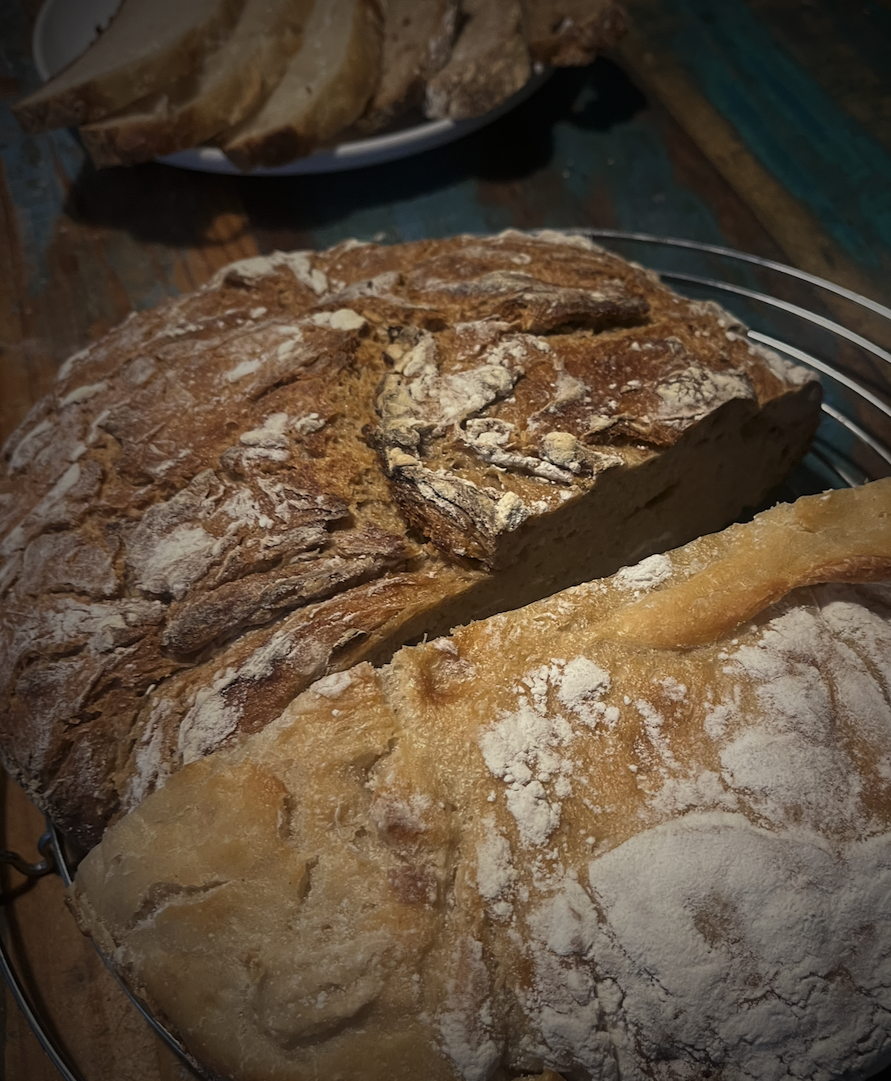
- It should be easy to get the bread from the dutch oven, a wooden spatula helps, drop bread on a cooling rack or wooden board. Let it cool before slicing.
Your bread is ready, enjoy with a little butter or jam or both, cheese, avocado, or mayo? I will post a simple receipe to make delicious and healthy mayo in your own kitchen, for a fraction of what the chemicals from the grocery store would cost you.
More to Come ...
I'll share notes on different breads, flours, and baking schedules in future posts — but this is the basic process.
Enjoy your bread!